These instructions are designed to help you create a local version of the programming environment that we will be supporting for this course. As a “systems course”, we will be doing some things that require “administrator privileges”, and I want you all to have a safe environment to work in so that mistakes don’t harm your computer or cause you to lose data. In addition, if we all create a uniform environment, the instructions in the assignments can be more specific/accurate and we will all be on the same playing field.
Honor Code
For this lab, collaboration is not restricted by the honor code. You may ask anyone for help, and if you do, I encourage you to share what you’ve learned with your classmates. I do ask, though, that if you find an issue that is not covered by this document (especially a missing or incorrect step), please let me know so I can update the document. The goal of this “lab” is to get us all ready to do the actual work of the course.
Assignment Overview
In this assignment, we will install and configure Ubuntu 20.04 (“Focal Fossa”). Linux is the operating system (OS) that we will be supporting in this course, and Ubuntu is the “Linux distribution” that we will be using. What that essentially means is this: Ubuntu is the name of a slightly modified version of the open source Linux operating system code that is packaged together with a set of applications and services (e.g., web browsers, terminals, email clients, etc.). The result is a user-friendly, easy-to-configure, and free OS that, as a result, has a large community with good documentation/support.
There are two ways you might want to install Ubuntu.
The first option is to install Ubuntu on “bare metal”, i.e., directly on your computer as a primary OS. This is not necessarily what I would choose to do; in fact, even if you already use Ubuntu as the primary operating system on your computer, there are still benefits to taking option two.
The second option is to install Ubuntu inside a virtual machine, using an application like VMware Workstation (or VMware Fusion on macOS). There are actually several different classifications for “virtual machine monitors” or “hypervisors”, and this document will show you how to install a VMware hypervisor so that you can run the Ubuntu operating system as an application inside your host operating system. This will let you create a separate “safe” environment so that you can isolate the work for this course from the rest of your computer. If you take this approach, you won’t have to worry about corrupting data or changing your computer’s look or feel in order to complete this course. Everything you do will be 100% reversible.
Installing Ubuntu on “Bare Metal”
If you already have Ubuntu installed, you can feel free to skip to the Setting up Ubuntu section below. You can successfully complete all the course tasks using Ubuntu as your primary OS. However, you may still want to install Ubuntu inside a virtual machine, so I encourage you to continue to the next section.
If you are still here, then you would like to install Ubuntu on “bare metal”, either as your primary operating system or to “dual boot” with another OS. Since this is somewhat outside the scope of this course, I will refer you to the official Canonical documentation (Canonical is the company that maintains Ubuntu) if you would like to install Ubuntu as your only OS. If you would like to “dual boot” Ubuntu alongside Windows 10 (i.e., you can choose which OS to enter when you boot your computer), itsfoss.com is a fairly reliable source. Note: I have not personally followed these instructions, but I believe them to be accurate.
Installing Ubuntu inside a VMware product
The department has the ability to grant us each a temporary VMware license. We can use that license to download an appropriate VMware product so that we can install, run, and manage a virtual machine. If you would like to do this, please send me an email, and I will request a license for you. Once you have a license, the following steps will let you install and set up your environment:
To start, download the latest version of Ubuntu 20.04 Desktop. You will almost certainly want to select the 64-bit PC (AMD64) download link. (If you think you have a 32-bit system, please let me know!) When you click the link, a file named something like “ubuntu-20.04.2-desktop-amd64.iso” should begin to download (although newer Ubuntu versions may be released after these instructions are written; if so, they may have a version number of 20.04.3 or higher…). You don’t need to wait for the download to complete. We will use this file later to install Ubuntu inside your virtual machine.
If you requested access to a VMware product academic license, you should have received an automated email from noreply@kivuto.com with the subject “An account has been created for you”. Inside, there is a link to “Click here to complete your registration”. Click that link and follow the instructions. (Your username is your Williams email.)
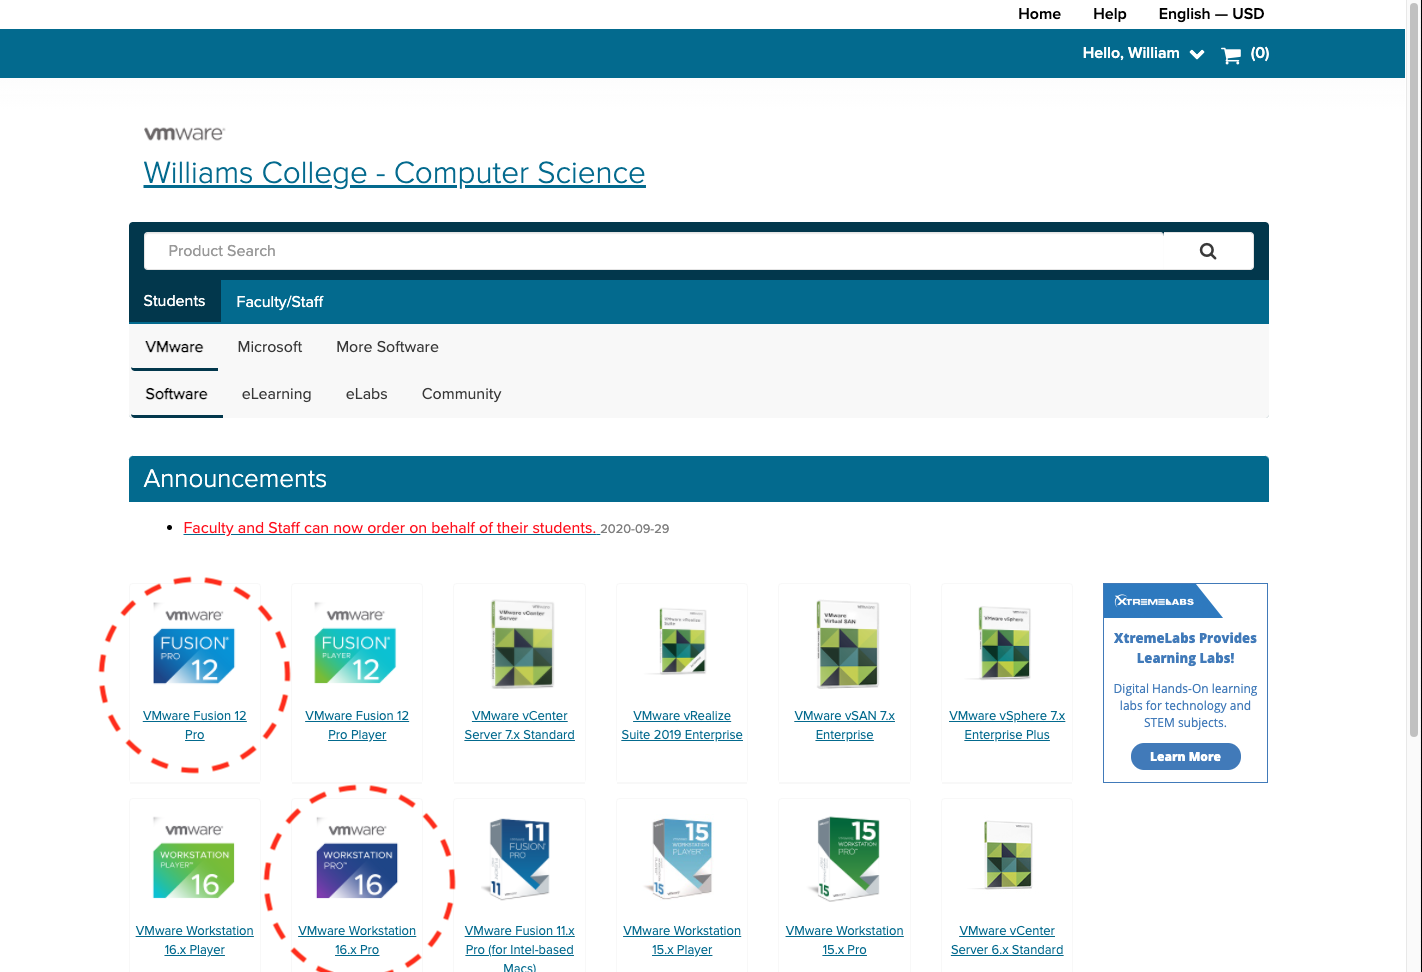
When you log into your account, you should see a link/title that says “Williams College - Computer Science” and there will be tabs for “Students” and “Faculty/Staff”. You will want to go to the “Students” tab, then the “VMware” tab, and then the “Software” tab. Here is what it looks like on my web browser:
If you are on macOS, you will want to download “VMware Fusion 12 Pro”. If you are on Windows or Linux, you will want to download “VMware Workstation 16.x Pro” (when you click that link, you will select your platform to download the appropriate version for your OS).
As you wait for the application to finish downloading, you should look for the serial number associated with your download that you will use to activate your product. The serial number can be found on the webpage in the “Your Account/Orders” menu, after clicking on the “View Details” button.
From here, the instructions are slightly different depending on your host operating system.
The first thing you should do is open your System Preferences application.
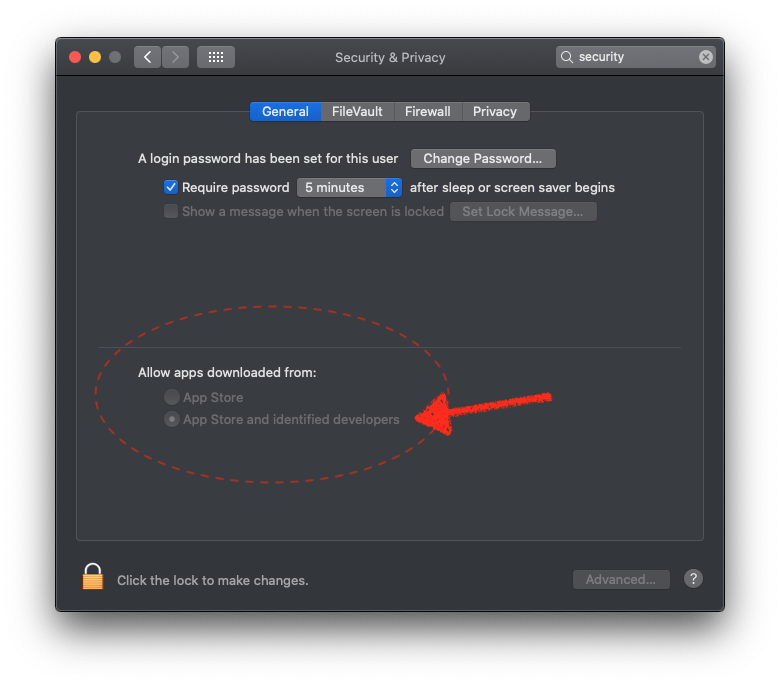
Inside your “Systems Preferences” app, go to the “Security & Privacy” section (it has a house-like icon). Inside the “Security & Privacy” menu, select the “General” tab.
At the bottom, you should see a radio box to select an option to “Allow apps downloaded from:”. You want to select “App Store and identified developers” if it is not already checked.
System Preferences
Now, please double click the .dmg file that you downloaded to start installing VMware Fusion.
During the installation process, you will be presented with many popups to grant VMware Fusion permissions to use certain macOS features. I granted access to all of the requests, but if you have questions about any of the options, I am happy to talk through their implications; you should feel comfortable with your choices.
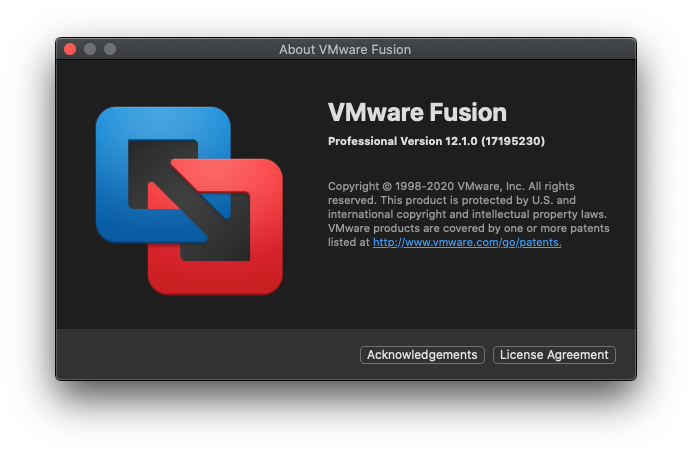
As soon as you have installed VMware fusion, you will want to update it to the latest version. In the “VMware Fusion” Application menu at the top left of your Desktop screen, select “Check for Updates”. After installing updates, you should be at version 12.1.0.
Fusion Version
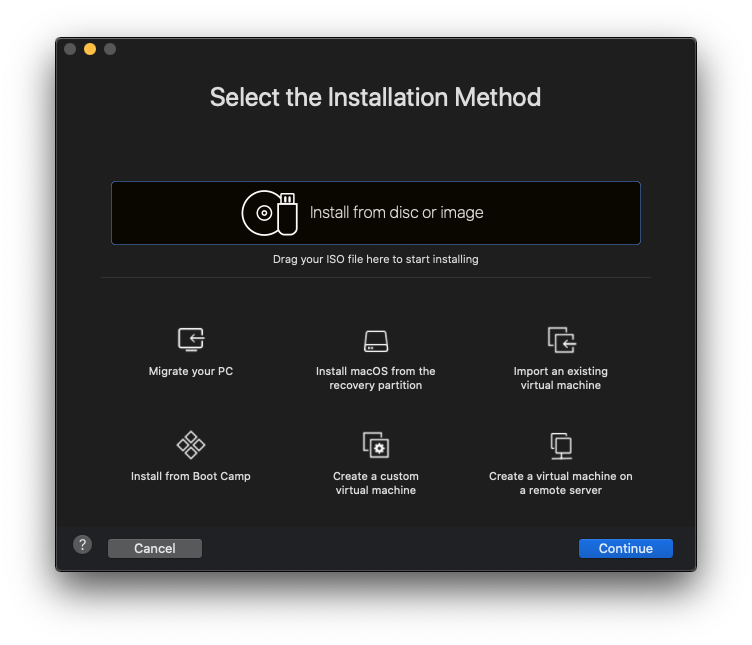
After opening the VMware Fusion application, you should be presented with the following window:
Install-OS
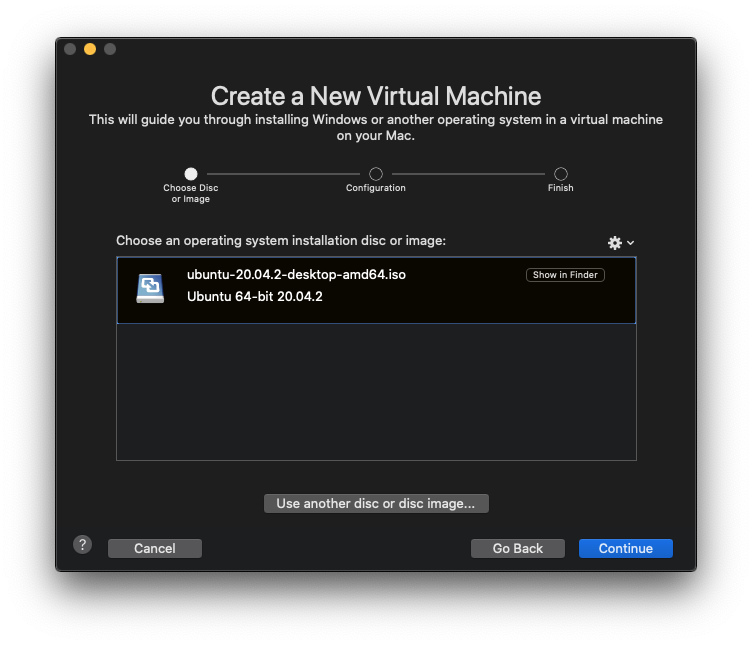
Please drag the Ubuntu download file into this window (it should be named something like ubuntu-20.04.2-desktop-amd64.iso, and likely residing inside your Downloads directory). The window should change:
ISO selected
Click continue.
please fill in your desired options, but I encourage you to use easy install.
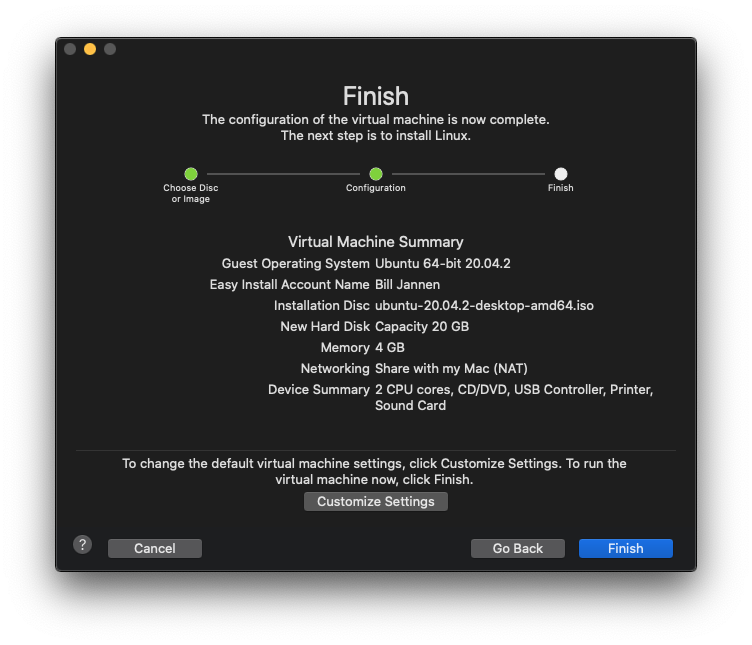
After clicking next, you will be presented with some default configurations.
Default-config
You can choose to accept them; we can always adjust them later. After clicking finish, you will be asked to save your VM. I chose to name my VM file cs333.vmwarevm, but the name of the file is not important (But since I personally keep several VMs around for various purposes, and I want to be able to distinguish among them).
At this point, your VM should start. If it is successful, Ubuntu should automatically install itself. (Success manifests itself as changing screens and moving progress bars; the automated installation of Ubuntu in your VM may take a moment, so feel free to go for a walk or grab a cup of coffee.) IF things are working, you can now skip to the setting up Ubuntu step. If not, there are a few potential issues, which we the steps below can hopefully resolve (I personally had to troubleshoot my installation, and these steps worked for me. If they do not work for you, we will debug together).
When I first tried to boot my VM, I immediately got an error that said:
Error: Could not open /dev/vmmon: Broken pipe.
If you updated VMware Fusion to version 12.1.0 like the instructions above said to do, it supposedly has a new feature called “Fusion Health Check” that resolves this issue with a single click. I could not find any documentation on how to use this feature or how it works, so I had to fix this manually. Depending on how you have configured macOS, there are several possible solutions, each of which is a bit more complex than the last.
The first thing to try is to open your “Systems Preferences” app, then go to the “Security & Privacy” section (it has a “house-like” icon). Inside the “Security & Privacy” menu, select the “General” tab. If you’re lucky, you should see some text at the bottom that says:
System software from vendor “VMware, Inc.” was blocked from loading.”
and there should be an option to click on “Allow”.
If so, select “Allow”, then shut down your computer (shut down, not restart). When you turn your computer back on, you will hopefully be able to start your VM.
For me, that option did not appear in my “General” settings (there wasn’t anything below the radio box that said “Allow apps downloaded from App store and identified developers”), and I had to manually resolve the issue. This is the result of Apple’s more stringent security policies trying to prevent applications from making unauthorized changes to your OS and installing malware. This link does a nice job of explaining the steps to allowing VMware to install its necessary extensions, but I will repeat them here.
Write down the “Team Identifier” EG7KH642X6 on a piece of paper (case matters). That string is the unique identifier associated with the company VMware; we will need to type it later, so save it.
Reboot your mac, and hold the “Command” key and the “R” key as it boots. This will start your mac in recovery mode.
After recovery mode stops doing its diagnostic checks, you are given a window with some options. Ignore that window, and instead select the “Terminal” from inside the “Utilities” menu at the top of the screen. This will open a terminal.
This runs the spctl program and tells macOS to grant the kernel extensions (kext) associated with VMware (EG7KH642X6) consent to load.
Reboot your machine.
Now you should be able to start your virtual machine! If not, check the “Security & Privacy” menu again as described above. The option to trust VMware might now appear there.
(Here are some official-ish directions from the VMware knowledge base if you want to read more).
At this point, if you can start your VM, it will automatically install Ubuntu, and you can skip to the setting up Ubuntu step. If you cannot start your VM, please contact me so we can resolve the situation.
Windows/Linux and VMware Workstation Pro
Installing a VMware Workstation Pro on Windows and Linux is more straightforward than installing VMware Fusion on macOS, and the instructions are very well documented elsewhere (including in YouTube videos that walk through the process in a variety of languages and in a variety of quality).
I’ve copied the relevant installation instructions from the official VMware docs for Windows and VMware docs for Ubuntu below (links: Windows|Ubuntu). I encourage you to follow them because they are kept up-to-date by the VMware team, and are more trustworthy. (The instructions for each OS include a “Procedure for ___” and a “Results on ___” section, and I’ve added brief instructions on how to install Ubuntu after you’ve installed VMware workstation.)
Procedure For Windows
Log in to the Windows host system as the Administrator user or as a user who is a member of the local Administrators group.
Double-click the VMware-workstation-xxxx-xxxxxxx.exe file, where xxxx-xxxxxxx is the version and build numbers. (Bill note: this is the file you downloaded above)
Follow the prompts to finish the installation. Depending on your configuration, you might need to restart the host system to finish the installation.
Results On Windows
After Workstation Pro is installed, the VMware Workstation Server service starts on the host system. The VMware Workstation Server service starts whenever you restart the host system.
Install Ubuntu inside a new VM on a Windows host
Now that you’ve installed VMware Workstation Pro, you want to install Ubuntu 20.04 inside a new VM.
After rebooting your machine, you should be able to start the VMware Workstation Pro application. You should then see a few options in the middle of the screen. Select the “Create a new Virtual Machine” (there is a plus icon).
You will want to select the Ubuntu disk image that you downloaded before to be your installation media. It should automatically install, and you’re done!
where xxxx-xxxxxxx is the version and build numbers, and architecture is x86_64. (Bill note: this is the file you downloaded above)
Accept the Open Virtualization Format (OVF) Tool license agreement.
Follow the prompts to finish the installation.
Results for Ubuntu
After Workstation Pro is installed, vmware-workstation-server starts on the host system. When Workstation Pro starts, log in using your regular user name, not root. vmware-workstation-server starts whenever you restart the host system.
Install Ubuntu inside a new VM on an Ubuntu Host
Now that you’ve installed VMware Workstation Pro, you want to install Ubuntu 20.04 inside a new VM.
After rebooting your machine, you should be able to start the VMware Workstation Pro application. You should then see a few options in the middle of the screen. Select the “Create a new Virtual Machine” (there is a plus icon).
You will want to select the Ubuntu disk image that you downloaded before to be your installation media. It should automatically install, and you’re done!
If you are at this point of the document, you should have successfully installed a VMware product and installed the Ubuntu 20.04 operating system inside a virtual machine. This section will explain how to install the minimal set of tools that we will need to complete assignments in this course.
Installing Necessary “Packages”
Ubuntu is the lab environment that you should have used in all of your CS courses taken after CS136. However, in our computer labs, the department installs all of the necessary packages for you. Here, we will do that ourselves.
Ubuntu has a few applications to help you select and install software that you want, but we will start by using a command-line tool called apt to install the minimal set of tools you’ll need for the course.
Open a terminal (a handy keyboard shortcut is Ctrl-Alt-t, i.e., press the t key while holding the control key and the alt key).
The sudo utility lets you run a single command as the super user. The apt program is used for installing and removing software as “packages”, and we are installing two packages: build-essential (which contains essential C development applications like make, gcc, gdb, etc.) and git.
Hit enter (or “y”) to confirm.
You’ve now installed git and the minimal set of tools needed for C development (make, gcc, gdb).
You can install many packages to customize your virtual machine. I personally can’t program without:
emacs
tmux
cscope
but you may have different choices! Feel free to customize your VM to your heart’s content!
(EXTRA) Customize Your Environment
Here is an old winter study handout that might be interesting for those who want to explore more. There’s a lot of “extra” stuff in there, but I always find it fun to customize/set up a new system!
If you are experienced with Ubuntu, programming in C, or want to chat more, please use the course Slack channel to share your favorite packages and customizations.
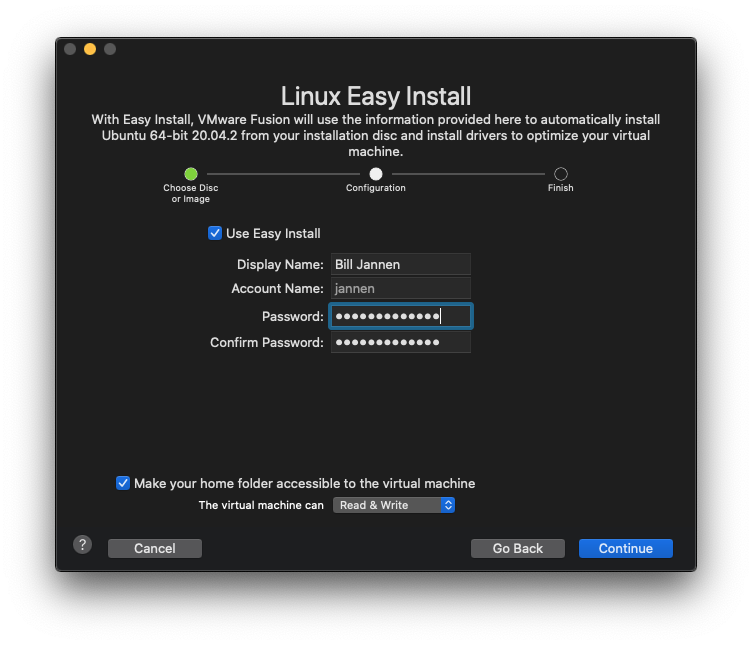 please fill in your desired options, but I encourage you to use easy install.